Wednesday, February 29, 2012

Tatting: Lesson 1


I am so excited about learning tatting.  My Aunt Lorraine is teaching me the craft.  I took photos of some of her pieces in a previous post.  

All you need to start out is a shuttle and string.  The string here is pearl cotton, size 12.  

Step 1: Wind the string onto the shuttle.  I forgot to take a picture of this process, but it is easy.  There is a small hole in the center of the shuttle.  (You can't see it because it is covered with string.)  Thread the string through this hole and tie a knot to secure.  There are small spaces on either end of the shuttle where the plastic meets.  The string slips right in between for winding and unwinding.   
 Below is what I'm making in this lesson.  
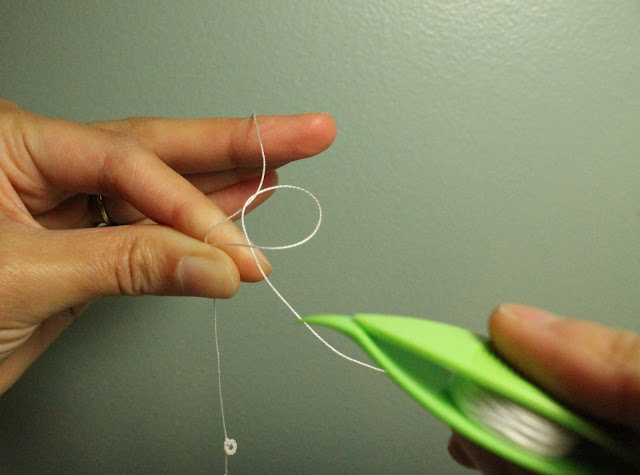
 Step 2: Hold the string as seen below, with the tail hanging down.
 Step 3: Wrap the string around the rest of your fingers and hold onto this end also.  The string forms a big loop around your fingers.
 Step 4: This first knot is the "under knot." (That is not an official name, but what I will call it here.)  Bring the fingers of your shuttle hand under the string as seen below.  
Here is a view of the shuttle hand from the back side to help clarify:
Step 5: Guide the shuttle under the string between the index and middle fingers of your non-shuttle hand.
 Step 6:  Guide the shuttle back over top of the string of the non-shuttle hand and pull through.
 Here is the pull-through.  Keep the string in the left hand loose while pulling the shuttle string tight.  
 Step 7:  Pull the string until the knot is near your index finger and thumb as seen below.
 Step 8: Now for the "above knot," as I'll call it.  Guide the shuttle over the top of the string in your left hand.
 Step 9: Then bring it under the string and pull it through.  
 Remember to keep the string in your left hand loose, while the shuttle string is tight.  
 Use the middle finger of your left hand to help tighten the knot after the string has "flipped."  This is very difficult to explain without actually showing it in person.  If the string hasn't flipped and you tighten the knot anyways, you will know you have made a mistake when the knots do not budge when you pull the shuttle string to create the loop. 
 After you have made multiple "under" and "above" knots in a row, you simply pull the shuttle string until a loop is formed.  (If the string is stuck that means at some point a knot wasn't allowed to flip before tightening.  You will have to try to undo the knots, or just cut it off and start again.)  See the photos below for forming the loop:
 Finished loop:
 Someday I will be making these:
 For now I'm just making a lot of these:
These pictures might not be enough!  There are over 2,000 videos on YouTube that show tatting in action.  

Tuesday, February 28, 2012

Quilting My Scrub Quilt

I'm quilting the scrub quilt with thick string and wider stitches.  I've always wanted to do a quilt this way. It is difficult to pull the needle through the layers with bare fingers.  I didn't have those grippy finger covers at home, so Daniel let me use one of the gloves he used to use for tattoos.  I cut off the other fingers so they could breath a little.  It works pretty well!
 Here are my tools: string (the same I used for the friendship earbuds, and so many other projects), thimble, thicker needle, and threader.  

Friday, February 24, 2012

Treats and Tea

Here are the tasty treats we recently enjoyed.  I love close-up photos of treats.  I can't help it!  I work this weekend, so I'll be back next week.

Thursday, February 23, 2012

Peanut Butter Oatmeal Cookies

I haven't made cookies in a very long time.  Daniel requested peanut butter oatmeal cookies, so I searched and found this recipe on allrecipes.com.  The cookies are so delicious!!  I will be making these again.  The recipe can be found here.  I didn't make the filling part, but it sounds good.  Maybe next time...

Wednesday, February 22, 2012

In the Garden

It is beautiful, sunny and warm outside.  A perfect afternoon for digging up unwanted bulbs.
 The darker green fuzzy leaves in the front are the new winter growth.  This is a hearty herb indeed.

Tuesday, February 21, 2012

Cornbread Blueberry Muffins

 This couldn't be easier.  Just mix up the cornbread, which means adding an egg and milk, and then add blueberries.  Bake according to the package directions.
I love the crunch of cornmeal.

Monday, February 20, 2012

Quilt Made from Scrubs

Christina gave me these scrubs a couple of years ago, and they didn't fit me.  I'm finally using them!
From a wrinkled mess...
To a small mountain of strips...
 To a work in progress...
I'm excited about this quilt.  I just can't get away from the log cabin design.  It is my ultimate favorite.

Sunday, February 19, 2012

Remembrance Day

On this day in 1942, Executive Order 9066 was signed by the president allowing for the interment of 120,000 Americans of Japanese ancestry.  It's hard to imagine the feelings and experiences of those who were told they must leave their homes.  I made this Sashiko embroidery of my home to reflect on this part of our history.  Visit this PBS link to learn more about the interment and its effects on people today.

Saturday, February 18, 2012

Felted Crocheted Flower

 Spent a pleasant part of the afternoon sitting by the fireplace making this flower.  My cousin came over for some flower-making instructions from my mom, and I joined in the fun.  The pattern comes from Nicky Epstein's book, Crocheted Flowers.  
 I love the felted look!